For clinics, maintaining peak laser performance is essential not only for safety but also for consistent clinical results. In this guide, we outline calibration steps, maintenance schedules, and practical tips to help you protect your investment and maintain reliable outcomes for patients.
Why Maintenance Matters
CO₂ fractional lasers use carbon-dioxide gas or an RF-excited tube to generate a 10,600 nm infrared wavelength. This wavelength interacts with water molecules in skin tissue, creating a controlled thermal effect. Because it’s a high-precision energy system, any misalignment or power fluctuation can alter energy delivery—resulting in inconsistent ablation depth, overheating, or sub-optimal results.
Proper maintenance ensures:
- Consistent beam energy for uniform resurfacing.
- Stable spot size and accurate scan pattern.
- Extended tube life and reduced consumable cost.
- Patient safety and reproducibility across sessions.
Regular calibration also demonstrates compliance with clinical equipment standards (ISO 13485, CE, or FDA-cleared requirements).
How the CO₂ Fractional Laser Works


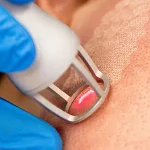
During a fractional CO₂ laser skin-resurfacing treatment, the device projects hundreds of micro-beams that penetrate the epidermis and upper dermis. These microthermal zones (MTZs) remove old, damaged cells while leaving surrounding tissue intact to speed healing.
Key System Components
- Laser source: either a sealed CO₂ tube or RF-excited module.
- Optical delivery arm: a 7-joint articulated arm that transmits and focuses energy.
- Scanning system: digital mirrors control pattern shape (circle, hexagon, square).
- Cooling system: air-flow channels protect optics from heat build-up.
- Touchscreen control: sets parameters for pulse width, scan area, and power output.
Because the device integrates optical, electronic, and mechanical systems, maintenance must cover all these aspects.
Daily Operator Checks
Before every clinical day, operators should perform a five-minute inspection to ensure the device is functioning optimally.
Visual and Functional Check
- Inspect handpieces for cracks, residue, or contamination.
- Clean the lens and mirror gently using lint-free swabs and approved optical cleaner.
- Check the articulated arm joints for smooth movement—no stiffness or resistance.
- Verify aiming beam alignment by firing onto test paper; the red beam should center within the treatment pattern.
- Listen for irregular noises from fans or the power supply.
- Confirm emergency stop button and key switch functionality.
Document the check in your maintenance log for regulatory compliance.
Weekly Calibration Routine

Calibration verifies that the laser’s energy output matches the displayed value. Variations can develop from dust on mirrors, tube wear, or temperature shifts.
Step-by-Step Calibration (General Reference)
- Warm-up period: power the device for 10 minutes to stabilize CO₂ gas pressure.
- Select test mode: choose “calibration” or “energy test” on the control screen.
- Attach a power meter or energy sensor supplied by the manufacturer.
- Set test parameters: e.g., 10 W / 100 ms pulse.
- Fire 3–5 test shots and record readings.
- Compare measured output to display value.
- Tolerance: ±10 % is typical for CO₂ fractional systems.
- Adjust mirror alignment or laser current if outside tolerance (qualified engineer only).
If output drifts frequently, contact your authorized service partner—tube replacement may be due.
Monthly Maintenance Checklist
|
Component |
Action |
Purpose |
|
Optics (mirrors & lenses) |
Inspect and clean |
Maintain transmission efficiency |
|
Cooling fan & filters |
Remove dust |
Prevent overheating |
|
Articulated arm joints |
Lubricate with optical grease |
Maintain flexibility |
|
Scan head |
Check motor response |
Ensure pattern accuracy |
|
Software |
Run diagnostic mode |
Identify system errors |
|
Electrical cables |
Inspect insulation & plugs |
Avoid current leakage |
Keep detailed records of maintenance activities. They protect warranty coverage and demonstrate quality management compliance.
Annual Service Schedule
A certified technician should conduct a full performance evaluation once per year, or every 1,000 hours of use.
Annual service includes:
- Tube output measurement at multiple power levels.
- Mirror and lens replacement if reflectivity < 90 %.
- Arm alignment recalibration.
- Cooling fan, filter, and thermistor inspection.
- Software firmware update and safety validation.
- Electrical safety test (PAT).
Replacing key consumables early—like the RF tube—prevents costly downtime later.
Cleaning and Handling Best Practices

After Each Treatment
- Wipe the handpiece and skin-contact parts with 75 % isopropyl alcohol.
- Remove carbonized debris from the lens using gentle circular motions.
- Dispose of used tips or sterile tubes appropriately.
Storage
- Store handpieces in dry, dust-free cases.
- Cover the main console with a soft cloth when idle.
- Maintain room humidity between 30–70 % to prevent static damage.
Avoid
- Touching optics with bare fingers—skin oils reduce transmission.
- Using unapproved cleaners, which can corrode coatings.
- Operating in rooms above 28 °C without proper ventilation.
Cooling System Care
Air-cooled CO₂ systems rely on steady airflow to prevent tube overheating.
Maintenance tasks:
- Clean intake vents weekly.
- Check internal temperature sensors during calibration.
- Replace filters every 3–6 months depending on dust level.
Some premium systems include a temperature auto-cutoff that stops emission if overheating occurs—always verify this failsafe works.
Beam Alignment Procedure
Proper beam alignment ensures that the visible aiming beam overlaps the invisible CO₂ beam. Misalignment can cause spot distortion or inconsistent ablation.
Simplified Alignment Guide
- Place white alignment paper at 50 cm distance.
- Fire low-energy test pulse.
- Observe burn mark vs. red-dot position.
- Adjust mirror screws (tiny quarter-turns) until perfectly concentric.
- Lock adjustments carefully.
Alignment should only be performed by trained technicians using protective eyewear rated for 10,600 nm.
Signs Your Laser Needs Servicing
- Reduced ablation efficiency: requires higher energy to achieve the same result.
- Uneven resurfacing pattern: one side of the scan lighter or darker.
- Frequent system errors or temperature alarms.
- Delayed startup or unusual odor from electronics.
Prompt servicing avoids downtime and keeps patient schedules running smoothly.
Staff Training & Safety Protocols
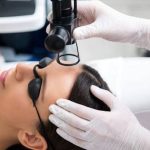
Every clinician must complete operational training before using a fractional CO₂ laser skin-resurfacing treatment system.
Essential Safety Rules
- Always wear protective goggles (10,600 nm rated)—both operator and patient.
- Post warning signs: “Laser in Use.”
- Use smoke evacuation filters to remove vaporized tissue plume.
- Keep a Class C fire extinguisher nearby.
- Activate emergency stop in case of malfunction.
Training should include device calibration basics, emergency response, and infection-control measures.
Optimizing Treatment Consistency

A well-calibrated laser delivers reproducible results across patients and sessions.
Key Factors for Uniform Outcomes
- Use identical energy parameters (fluence, dwell time, scan density).
- Calibrate once weekly if the clinic performs frequent resurfacing.
- Replace optics as soon as ablation depth varies across the field.
- Maintain a stable room temperature (20–25 °C).
Consistency not only improves safety but also strengthens patient trust in your clinic’s standards.
Troubleshooting Common Issues
|
Issue |
Possible Cause |
Solution |
|
Weak laser output |
Dust on mirrors / aging tube |
Clean optics or replace tube |
|
Irregular scan pattern |
Scanner motor fault |
Contact service engineer |
|
Overheating alarm |
Blocked vents / fan failure |
Clean filters, replace fan |
|
Burning smell |
Electrical overload |
Power down immediately, inspect |
|
Red aiming beam misaligned |
Mirror drift |
Realign or recalibrate |
Never attempt internal repairs without manufacturer authorization.
Cost Planning for Maintenance
|
Maintenance Task |
Frequency |
Average Cost (USD) |
|
Optical cleaning |
Monthly |
$50 – $100 |
|
Filter replacement |
3–6 months |
$30 – $80 |
|
Calibration service |
6 months |
$150 – $250 |
|
Tube replacement |
3–5 years |
$1,000 – $2,500 |
|
Annual full service |
Yearly |
$300 – $600 |
Factoring these predictable expenses into your pricing model helps preserve profit margins while maintaining device performance.
Patient Safety During Calibration
Calibration should always occur outside patient treatment hours.
Never fire test pulses near occupied treatment areas.
Use non-reflective targets and protective eyewear.
Post signage and lock doors during testing.
Such precautions maintain compliance with laser-safety standards (ANSI Z136.3 or equivalent).
Best Practices for Long-Term Reliability
- Keep a maintenance logbook documenting service dates, component replacements, and calibration results.
- Schedule preventive maintenance rather than waiting for failure.
- Store spare lenses and mirrors in sealed anti-static bags.
- Update operator software regularly to fix bugs or parameter drifts.
- Train backup operators to perform daily checks—consistency prevents oversight.
A well-maintained CO₂ fractional laser can perform efficiently for over a decade with minimal downtime.
 Purpose of Calibration and Maintenance
The purpose of systematic calibration and maintenance is to ensure:
- Accurate energy delivery during every CO₂ fractional resurfacing laser treatment.
- Uniform ablation depth for safe skin-resurfacing outcomes.
- Extended device lifespan and reduced repair cost.
- Compliance with clinical safety standards.
For aesthetic clinics, proactive care not only safeguards equipment but also preserves your reputation for quality results.
Material & Construction Overview
A professional CO₂ fractional laser combines optical precision and robust mechanical engineering.
Core Materials:
- Laser tube: sealed glass or RF-excited ceramic for high beam stability.
- Optics: gold-coated mirrors and ZnSe lenses (transmission > 99 %).
- Delivery arm: aluminum with Teflon bearings for flexible movement.
- Cooling: air-flow system with copper heat sinks.
- Casing: powder-coated steel or medical-grade polymer housing.
Understanding these materials helps technicians identify wear signs early.
Key Takeaways
- Calibrate weekly or bi-weekly for high-volume clinics.
- Clean optics, fans, and filters regularly.
- Replace aging tubes proactively to prevent sudden failure.
- Maintain detailed service logs and operator training records.
- Partner with an authorized technician for annual validation.
Consistent maintenance guarantees every fractional CO₂ laser skin-resurfacing treatment remains safe, effective, and profitable.